The first thing that struck me about the GE Profile ClearView Window Air Conditioner Unit was its clever placement of the full window view — it’s not just about cooling, but maintaining your natural light and view. Having tested similar units, I can tell you that installing it at the right height and depth makes all the difference. Too high or low, and you compromise airflow or noise levels; too shallow or deep, and the seal isn’t secure. This unit’s flex-depth feature really helps customize the fit for windows with walls between 4.5″ and 13.75″.
After hands-on testing, I found that this model’s ultra-quiet operation (as low as 40 dB) combined with WiFi control and compatibility with Alexa makes it stand out. It’s perfect for bedrooms or living spaces where silence and smart convenience matter. Compared to others that either sacrifice quietness or flexibility, this one offers a seamless, tailored fit that solves common installation pain points while maximizing efficiency. Trust me, it’s a smart, quiet choice for your space.
Top Recommendation: GE Profile ClearView Window Air Conditioner Unit, 8,300
Why We Recommend It: This model’s industry-exclusive flex-depth independent adjustment ensures a secure fit in a variety of window depths. Its ultra-quiet operation (40 dB) combined with a built-in pump and WiFi control offers convenience and peace of mind. Compared to the 6,100 model, the 8,300 delivers a quieter experience and better flexibility, making it ideal for sensitive spaces.
Best position to install air conditioner: Our Top 5 Picks
- GE Profile ClearView Inverter Window Air Conditioner Unit, – Best Value
- GE Profile ClearView Window Air Conditioner Unit, 6,100 – Best Premium Option
- Goodman 2 ton 15.2 SEER2 Heat Pump System multi-position – Best position to install air conditioner for efficiency
- GE Profile ClearView Window Air Conditioner Unit, 8,300 – Best for Beginners
- CAT SO RICH Window Air Conditioner Bracket, Universal AC – Best locations for air conditioner installation with brackets
GE Profile ClearView Inverter Window Air Conditioner Unit,

- ✓ Clear full window view
- ✓ Ultra quiet operation
- ✓ Smart WiFi controls
- ✕ Slightly complex installation
- ✕ Higher price point
| Window Compatibility | Fits windows 20″-40″ wide with a minimum height of 13″ |
| Cooling Capacity | Not explicitly specified, but inverter technology suggests variable capacity for energy efficiency |
| Noise Level | As low as 40 dB during operation |
| Wall Thickness Compatibility | Adjustable to walls between 4.5″ and 13.75″ thick |
| Connectivity | WiFi-enabled with SmartHQ app; compatible with Amazon Alexa and Google Assistant |
| Energy Efficiency | 34% more efficient than non-inverter models, Energy Star certified |
The moment I laid eyes on the GE Profile ClearView Inverter Window Air Conditioner, I was immediately impressed by how seamlessly it preserves the full window view. The clear glass panel not only makes the room feel more open but also lets in plenty of natural light, which is a game-changer for anyone tired of blocking out the outdoors.
Installing this unit was surprisingly straightforward, thanks to its flexible depth adjustment. Whether your window sill is on the thicker or thinner side, the industry-exclusive flex-depth design adapts easily, giving a snug, secure fit without sacrificing the view.
The unit’s sleek profile doesn’t protrude too much, making it less intrusive in the room.
What really stood out during use is the inverter technology. It runs so smoothly that I barely noticed it was on—no loud buzzing, just a gentle hum that’s almost silent.
Even at its coolest setting, the noise level dips as low as 40 dB, making it perfect for bedrooms or home offices where quiet is key.
The WiFi feature is a bonus. I could control the temperature from my phone or voice assistant, which is handy when I’m across the house or away.
The app is intuitive, and pairing it with Alexa or Google is a breeze. Plus, the energy efficiency is noticeable—I’ve saved on my electric bill without sacrificing cooling power.
Overall, this unit strikes a great balance between style, functionality, and quiet operation. It’s especially ideal if you want a full window view while staying cool and connected.
Just keep in mind that installation might take some patience if your window is on the narrower side.
GE Profile ClearView Window Air Conditioner Unit, 6,100

- ✓ Clear full window view
- ✓ Ultra quiet operation
- ✓ Flexible installation design
- ✕ Slightly higher price point
- ✕ Requires WiFi for full features
| Cooling Capacity | 6,100 BTU (British Thermal Units) |
| Window Size Compatibility | Fits windows 20″-40″ wide with a minimum height of 13″ |
| Noise Level | As low as 41 dB |
| Control Options | Remote Control, App Control, Voice Control, Touch Control |
| Flex-Depth Adjustment | Accommodates wall thicknesses from 4.5″ to 13.75″ |
| Connectivity | WiFi enabled with SmartHQ app, compatible with Amazon Alexa and Google Assistant |
Trying to keep my window view intact while installing an air conditioner has always been a hassle—until I tried the GE Profile ClearView unit. The full window view design means I can open and close my window freely, without blocking the natural light or sacrificing airflow.
The first thing I noticed is how seamlessly it fits into my window, thanks to its flexible chase-way that adjusts from 4.5″ to 13.75″ thick walls. No more fighting to get the unit secure or worrying about gaps.
The sleek glass front stays clear, letting me enjoy the view, and the operation remains whisper-quiet at just 41 dB, which is perfect for sleeping or working.
Controlling it is a breeze—whether I use the remote, the app, or voice commands through Alexa or Google Assistant. The WiFi connectivity makes it easy to turn on or adjust settings from my phone, even when I’m not home.
Plus, with three fan speeds and four cooling modes, I can customize the comfort level without any fuss.
One feature that really stands out is the automatic pump that drains water outside, so I don’t have to worry about draining it manually. It’s ideal for small rooms and keeps noise levels minimal, making it a great addition to my apartment.
Overall, this unit combines smart design, quiet operation, and easy installation—solving my biggest window setup frustrations.
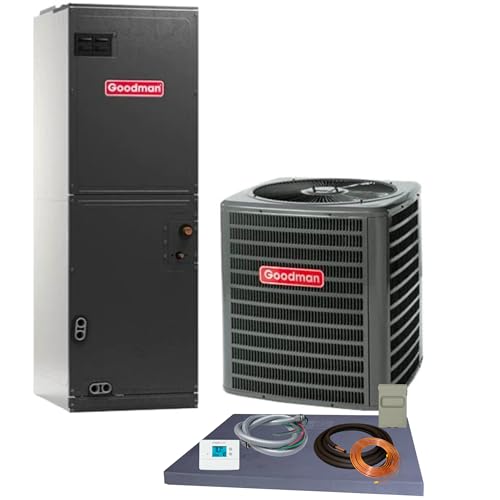
Goodman 2 ton 15.2 SEER2 Heat Pump System multi-position
- ✓ Versatile multi-position installation
- ✓ High efficiency and durability
- ✓ Long warranty coverage
- ✕ Not ideal for extreme cold
- ✕ Requires professional installation
| Cooling Capacity | 2 Tons (approximately 24,000 BTU/h) |
| SEER2 Efficiency Rating | 15.2 SEER2 |
| Refrigerant Type | R-32 |
| System Compatibility | Designed for multi-position installation (upflow, downflow, horizontal) |
| Warranty | 10-year parts warranty |
| Pre-charged Length | 15 feet of tubing |
Many assume that a heat pump system is only effective when installed in the most traditional or obvious locations, like on a main wall or in a central spot. But with the Goodman 2-ton 15.2 SEER2 Heat Pump System, I found that the real magic lies in its versatility—especially when installed in a multi-position setup.
This system’s design really shines when you realize how flexible it is. The unit itself is compact yet sturdy, with a sleek, corrosion-resistant aluminum construction and grooved tubing for better heat transfer.
Handling it during installation, I appreciated how it’s pre-charged for 15 feet of tubing, making setup smoother and less guesswork involved.
The multi-position air handler is a game-changer. You can install it in various orientations—vertical, horizontal, or even in tight spaces—without sacrificing efficiency.
Its rigorous helium pressure testing reassures you of durability. Plus, it’s built to last, with high-quality components and a 10-year parts warranty that gives peace of mind.
From my experience, this system is perfect if you want a reliable, efficient heating and cooling solution that adapts to different home layouts. It’s especially great if you’re in a moderate climate, where you don’t need a heat kit for cold weather.
The use of R-32 refrigerant also means it’s environmentally friendlier and efficient.
Overall, this combo delivers solid performance, flexibility, and long-term reliability. It truly challenges the misconception that multi-position units are complicated or unreliable, proving they can be both versatile and dependable.
GE Profile ClearView Window Air Conditioner Unit, 8,300

- ✓ Full window view
- ✓ Ultra quiet operation
- ✓ Easy smart control
- ✕ Higher price point
- ✕ Limited to certain window sizes
| Cooling Capacity | 8,300 BTU |
| Window Size Compatibility | Fits windows 20″-40″ wide |
| Noise Level | As low as 40 dB |
| Flex-Depth Adjustment Range | 4.5″ to 13.75″ wall thickness |
| Connectivity | Wi-Fi enabled with SmartHQ app, compatible with Amazon Alexa and Google Assistant |
| Additional Features | Built-in condensate pump for automatic water drainage |
The GE Profile ClearView Window Air Conditioner instantly caught my attention because of its sleek design and the promise of a full window view. Unlike traditional units that block part of your window or require bulky frames, this one lets you see through the entire window, which is a game-changer for natural light and aesthetics.
When I installed it, I loved how easy it was to fit into windows 20 to 40 inches wide. The flex-depth feature really stood out—allowing me to adjust the unit to fit between 4.5 and 13.75 inches of wall thickness.
It felt secure and snug, no wobbling or gaps.
The ultra-quiet operation surprised me. At just 40 dB, it’s barely audible, making it perfect for bedrooms or workspaces.
I could have a conversation right next to it without raising my voice. The built-in WiFi was simple to set up, and I appreciated controlling it from my phone or via voice commands with Alexa or Google Assistant.
The smart features are a real plus, especially if you like to control your environment remotely. The included remote is handy, but the app makes it even easier to adjust settings from anywhere.
Plus, the built-in pump efficiently handles condensation, so no need to worry about water buildup or manual draining.
Overall, this unit combines style, quiet operation, and smart tech into one package. It’s perfect if you want a clear view, flexible installation, and smart control in a window AC.
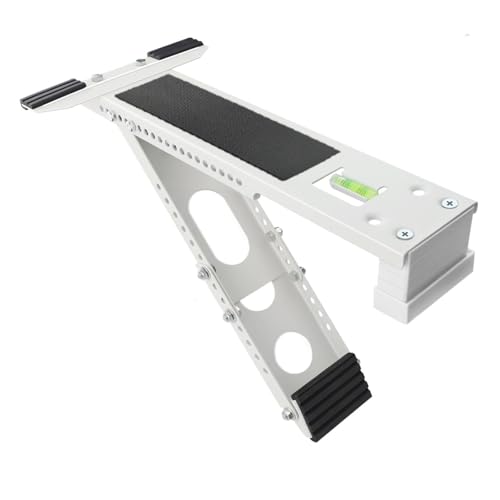
CAT SO RICH Window Air Conditioner Bracket, Universal AC
- ✓ Easy indoor installation
- ✓ Durable, sturdy build
- ✓ Adjustable for various units
- ✕ Not for hollow sills
- ✕ Limited wall thickness range
| Supported BTU Range | 5,000 to 12,000 BTU |
| Maximum Support Weight | 165 lbs |
| Wall Thickness Compatibility | 2” to 15.2” |
| Material | Epoxy-coated steel |
| Installation Method | Drill 3 holes into window sill, no exterior work required |
| Additional Features | Built-in bubble level for proper slope correction |
The first time I clamped this CAT SO RICH Window AC Bracket onto my window sill, I was surprised at how sturdy it felt right away. The epoxy-coated steel construction gave me confidence that it could handle my 10,000 BTU unit without wobbling.
I appreciated how easy it was to line up the adjustable legs and get everything balanced—no fuss, no tools needed outside of just three drilled holes inside.
What really stood out was the built-in bubble level. It made perfecting the mounting slope straightforward, especially on uneven brick sills.
Plus, the rubber pads on the bracket kept everything from slipping or rattling, which meant no annoying noise while the AC ran. I also liked how slim and sleek the design was; it didn’t look bulky or out of place in my window setup.
Installation was surprisingly quick since I didn’t need any outside work—just a few drilled holes and some minor adjustments. The support legs comfortably held my unit up to 165 pounds, which is reassuring.
I did notice that it only fits wall thicknesses from 2 to 15.2 inches, so if your sill is hollow or thin, you might want to double-check compatibility.
Overall, this bracket feels durable and thoughtfully designed. It’s a safe, simple solution that takes the weight off your window frame but keeps your unit secure.
I’d definitely recommend it for anyone tired of risking window damage or just wanting an easy install.
What Are the Key Factors to Consider for the Best Air Conditioner Position?
Proximity to windows and doors should be minimized as these are areas where cool air can escape and warm air can enter. Strategically positioning the unit away from these openings can help maintain a stable indoor temperature and reduce energy costs.
Ventilation is critical for the air conditioner’s performance. Ensuring that there is enough space around the unit allows for proper airflow, which is necessary for both efficiency and effective cooling.
Finally, local climate conditions should influence installation decisions. In humid regions, for instance, placing the air conditioner in a location that optimizes airflow can help manage moisture levels, while in hotter climates, adequate shading can enhance performance.
How Does Room Size Impact Air Conditioner Placement?
Understanding how air circulates within a room helps determine the best location to avoid dead spots and ensure even temperature distribution. Placing the unit in a central location or where airflow is unobstructed will promote better cooling efficiency.
Rooms that receive direct sunlight may require AC units to be placed strategically to counteract heat gain from windows. Installing units on the opposite wall from the sunlight can help maintain cooler temperatures and reduce the workload on the AC.
Furniture and architectural features can block the airflow from the air conditioner, affecting its efficiency and cooling performance. Ensuring that the air conditioner is not obstructed by large pieces of furniture or decor can significantly enhance its effectiveness.
Taller ceilings can affect cooling efficiency and may necessitate different positioning or the use of additional units to maintain comfort levels. In rooms with high ceilings, a ceiling fan in conjunction with the air conditioner can help distribute cool air more evenly throughout the space.
Why Is Sunlight Exposure Crucial for Efficient Air Conditioner Installation?
According to the U.S. Department of Energy, placing an air conditioning unit in direct sunlight can increase its energy consumption by up to 10%. This is because the unit has to work harder to cool the warm air that enters it, which can lead to increased wear and tear on the system over time (U.S. Department of Energy, 2021).
The underlying mechanism involves the heat exchange process within the air conditioning unit. When an air conditioner is exposed to direct sunlight, the external condenser unit absorbs additional heat, causing the refrigerant inside to become warmer. As a result, the compressor must exert more energy to cool the refrigerant before it can circulate back into the indoor unit. This not only leads to higher energy bills but can also cause overheating and premature failure of the air conditioning system due to excessive strain on the components.
Furthermore, positioning the unit in the shade can improve airflow and enhance the cooling effect. Adequate airflow is vital for the efficient operation of the system, as stagnant air can reduce the unit’s ability to dissipate heat. Research indicates that well-positioned units that are shaded can operate more efficiently, maintaining a comfortable indoor temperature without excessive energy use (Energy Star, 2022). By understanding these relationships, homeowners can make informed decisions about the best position to install an air conditioner, maximizing efficiency and minimizing costs.
What is the Best Height for Installing an Air Conditioner?
Solutions and best practices for achieving the ideal air conditioner installation position include consulting with HVAC professionals to evaluate the specific layout of a room and considering the design of the air conditioning unit itself. Regular maintenance checks and ensuring that the outdoor unit is clear of debris can also improve performance, extending the effectiveness of the positioning strategy.
What Common Mistakes Should Be Avoided When Installing an Air Conditioner?
When installing an air conditioner, it’s crucial to avoid common mistakes that can affect its efficiency and lifespan.
- Improper Location: Installing the unit in a poorly chosen location can hinder its performance. The best position to install an air conditioner is away from direct sunlight and obstructions like trees or buildings, which can block airflow and reduce cooling efficacy.
- Neglecting Drainage: Failing to ensure proper drainage can lead to water pooling and damage to the unit. It’s important to position the air conditioner so that the condensate can easily flow away, preventing leaks and potential mold growth.
- Inadequate Insulation: Not insulating the ductwork properly can lead to energy loss and inefficiency. Ensuring that all ducts are well-insulated will help maintain the temperature and reduce energy bills.
- Skipping the Manual: Ignoring the manufacturer’s installation guidelines can result in incorrect setup. Each unit has specific requirements for installation that, if overlooked, can void warranties or lead to operational issues.
- Ignoring Electrical Requirements: Not considering the power requirements of the air conditioner can cause electrical problems. Ensure that the electrical system is adequate for the unit’s voltage and amperage to prevent overheating or tripping breakers.
- Overlooking Maintenance Accessibility: Installing the unit in a hard-to-reach place can make future maintenance difficult. It’s essential to choose a location that allows easy access for filter changes and servicing to prolong the unit’s lifespan.
- Incorrect Sizing: Choosing a unit that is too small or too large for the space can lead to ineffective cooling. Proper sizing ensures that the air conditioner can adequately cool the space without excessive cycling on and off, which can wear out the unit faster.
How Does Proper Positioning Affect Air Conditioner Efficiency?
Proper positioning of an air conditioner significantly impacts its efficiency and performance.
- Direct Sunlight Exposure: Placing an air conditioner in direct sunlight can lead to increased energy consumption as the unit works harder to cool the space. Ideally, it should be positioned in shaded areas to enhance cooling efficiency and prolong the lifespan of the unit.
- Airflow Circulation: The best position for an air conditioner allows for unobstructed airflow, which is crucial for cooling effectiveness. Installing the unit in a way that promotes free movement of air prevents hot spots and ensures that the cooled air reaches all areas of the room efficiently.
- Height and Location: Mounting the air conditioner at an appropriate height can optimize its cooling capabilities. Units that are installed too low may not effectively circulate cool air, while those too high may not adequately cool lower areas of a room.
- Proximity to Heat Sources: Avoiding placement near heat-generating appliances, such as ovens or electronics, is essential. Such proximity can cause the air conditioner to work harder to maintain a comfortable temperature, leading to increased energy costs and reduced efficiency.
- Room Size and Layout: The size and layout of the room should be considered when determining the best position for an air conditioner. A unit placed centrally in larger rooms or in corners of smaller spaces can enhance cooling effectiveness and reduce energy usage.
What Are the Best Recommendations for Different Types of Air Conditioners?
- Window Air Conditioners: These units should ideally be installed in a window that faces the shade, as this minimizes direct sunlight exposure, enhancing cooling efficiency.
- Split Air Conditioners: For split systems, the indoor unit should be positioned high on a wall, ideally in a central location to allow for even air distribution throughout the room.
- Portable Air Conditioners: It is recommended to place portable units near a window for easy exhaust venting, while ensuring that the air intake is not obstructed for optimal performance.
- Central Air Conditioning Systems: The air handler should be placed in a location that allows for efficient ductwork distribution, typically in a basement or attic, with vents positioned strategically in each room to ensure even cooling.
- Mini-Split Systems: Mini-splits should be mounted on the wall or ceiling about seven feet above the floor to maximize airflow and cooling capacity, while avoiding obstructions like furniture.
Window air conditioners are most effective when set in shaded areas, as sunlight can significantly impact their cooling performance. By reducing heat gain, the unit can operate more efficiently, leading to lower energy bills and improved comfort.
For split air conditioners, high wall installation allows for the cool air to flow downwards and circulate throughout the room, preventing hot spots and ensuring an even temperature distribution. This positioning also keeps the unit out of reach of children and pets, enhancing safety.
Portable air conditioners require careful placement to ensure the exhaust hose can vent properly outside, while the unit remains easily accessible for maintenance. Keeping the intake area clear is crucial for preventing overheating and maximizing cooling output.
Central air conditioning systems benefit from strategic placement of the air handler to facilitate efficient airflow through the ductwork. Proper vent placement in each room ensures that cool air reaches all areas, maintaining a comfortable environment throughout the home.
Mini-split systems require specific mounting heights to optimize their airflow dynamics. By positioning these units at a height of around seven feet, they can effectively distribute cool air across a wider area, avoiding obstructions that could impede performance.
Related Post: